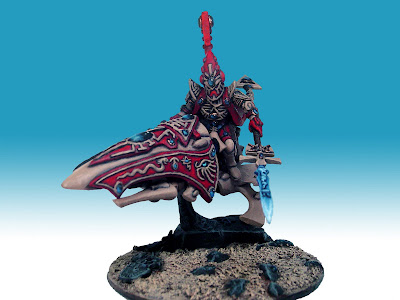
This is my Farseer on Jetbike as rebuilt in November of '08. I'd done him up for a contest held by Fritz at Way of Saim-Hann. Sadly, the contest details aren't up any more. There were some excellent entries and Ron at From the Warp ended up winning. He's also lost the original posts about it, but his final entry can be seen here on CMoN. Ron may have taken the contest, but I'm comforted by having a higher CMoN score. :-p Both Ron and I blogged about our progress during the contest; sharing tips, suggestions, or just simply raising the bar. This challenged us both to go beyond our regular comfort zones and I think the final products were much improved for it. The sculpt work shown here was far beyond anything I'd attempted prior...
Yet the thing is: nothing on that guy is really all that difficult. It was mostly a matter of patience, practice, planning and a little bit of sculpting know-how. The hardest parts were teaching myself sculpting and then trying something this large. In hopes of inspiring someone else (or maybe letting you learn from my mistakes), the first thing I want to talk about is tools.
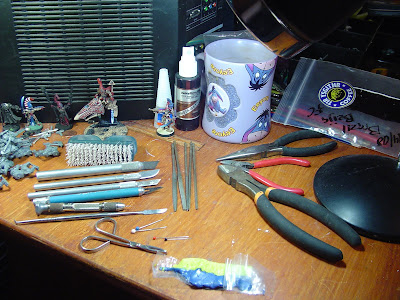
Here's a pic of the tools I use on a typical sculpting project:

In order from the top to bottom and left to right, these are:
1. Superglue: Necessary for basic construction. There's a plethora of glues with different viscosity, dry times and cost. Find the one that's right for you. Just remember that GLUE IS NOT GAP-FILLER! Glue monkeys will burn in a very special level of Hell. A level they reserve for child molesters and people who talk at the theater...
2. Glue Accelerant: Great stuff for speeding up glue dry times. However, you should always test and practice with it before working on your figs. Some combos can cause your glue to expand and glob, obscuring details. Others can make the glue brittle and unable to bear as much stress before breaking. There's even one combo I know (Insta-Cure & Zip-Kicker) that will melt plastic parts and cause 2nd-degree burns. So take care with your toxic chemicals and don't be stupid!
3. Coffee: It is by caffeine alone I set my mind in motion, It is by the beans of Java that thoughts acquire speed. The hands acquire shaking, the shaking becomes a warning...
Remember that sculpting requires both attention AND fine motor control. Be responsible with your coffee, soda, alcohol or other intake. Just think of the "great ideas" you've had while "under the influence" versus what they look like the next morning. This rule applies to sculpting too.
4. Inspiration Models: When sculpting or painting, I often like to have other models from the same army/line in the background as reference works. This will help quite a bit for having your final product cohesive with the rest of your army.
5. Cleaning Brush: I use the plastic bristle brush for general cleaning, especially washing the figs to remove molding agent. I'll also use a brass bristle brush, like those of cleaning BBQ grills, when buffing or stripping plastic or metal figs. I also have a makeup brush around to clean off light particulates like dust.
6. Hobby Knives and a Pin Drill: You likely already have some or most of these. The different heads and sizes are useful not only for converting, but also for certain sculpt shapes.
7. Needle files: Again mostly for the conversion process, but the teeth and handles can be used to create some fascinating sculpt patterns too.
8. Pliers, clippers and wire cutters: Great for clipping pins to size, removing sprue or molding tabs, or quickly chopping a miniature in half.
9. GW Sculpting Tool: This is the primary tool for this kind of project. You really don't need anything more complex, though there are some nice surgical steel tools and/or silicone tip clay shapers if you really get into sculpting.
10. Lubrication (Not Shown): One of the biggest tricks to sculpting is that putty is sticky. You will need something to keep your tools from sticking to the putty while you're working it. Chapstick, KY Jelly, Vaseline, soapy water, or saliva are all viable suggestions. It's just a matter of how long they'll stay slick, how much residue they leave, and how much cleanup you'll need to do after.
11. Tweezers: A necessity if you have any pets with hair.
 12. Pins: Used for really fine details where the shape and size of the tool can matter more than your ability to work the putty. As shown to the right, I use a couple different sizes, some with the point removed and filed smooth.
13. Epoxy Sculpting Putty: There's so much to cover there that it is getting an entire post. So stay tuned for next week's exciting adventure: "Sculpting 102: Putty"! Cheers and I hope you've enjoyed the read.


Inspiring jetbike and great tips. Especially the coffee ;-) Thanks!
ReplyDeleteSome great tips, thanks! Awesome Jetbike by the way!
ReplyDeleteI can't wait for more. I've wanted to start using GS for more than just filler, but I haven't had much luck with it so far.
ReplyDeleteI sculpted some sandbags on a tarrain piece last night. And there ends the extent of my sculpting experience :P Looking forward to more info.
ReplyDelete