Showing posts with label Space Hulk. Show all posts

Friday, May 14, 2010

W&N Matte Varnish

Greetings! A while back I ran out of my trusty bottle of Dull Cote Lacquer. Needing a replacement, I dropped by several stores to see if I could pick up a new one. Yet while I found the spray can version at a couple places, nobody was carrying the brush-on version.

Why did I care? Because there's certain things you can do with brush application that just don't work with spray. You can hit (or avoid) specific parts, control the thickness of coat, and get a LOT more coverage for your buck. On the downside, it requires a more time to apply and can be fiddly. But I figure that after I've spent *mumble mumble* hours on my average fig, what's an extra 5-10 minutes to hand apply the lacquer?

Eventually my quest washed my up at my local fine art store. Alas, they did not have what I was looking for. However, they did have a 75ml bottle of Winsor & Newton Matte Varnish. At only $5 after my university discount, it wasn't that much more than a spray bottle.

So here's Before:And After:About 5 minutes work and an hour or so of drying. Interestingly, my camera saw a large difference in saturation and muddled some of the colors... especially on the lighter yellow tones.

I've now done several figs with this product and have been very happy. It applies smoothly, tones things done VERY well, dries in a reasonable amount of time and doesn't leave the "grainy" feel that I've seen with sprays. It also thins out quite nicely.

However, do NOT mix it with other varnishes. The glossier a varnish is, the tighter and stronger a coat you get. Thus a gloss is much less likely to chip or flake compared to matte version. I normally do a base seal of gloss and then matte over that to the desired veneer. A couple days ago I started applying a bit of the matte to a fig when I realized I'd forgotten to do the base gloss. So I switched over, not thinking of what might happen... Yeah, it turned milk white. I should have taken a photo as it would have been an excellent example of what not to do.

Other than that, I have been quite happy with this product. I expect you'll see (or not see, as it is clear) this product on my figs for many, many posts to come.

Cheers and see you later!
***I'm sure the starter image is W&N's, but the others are my work...***

Tuesday, May 11, 2010

Space Hulk Genestealers

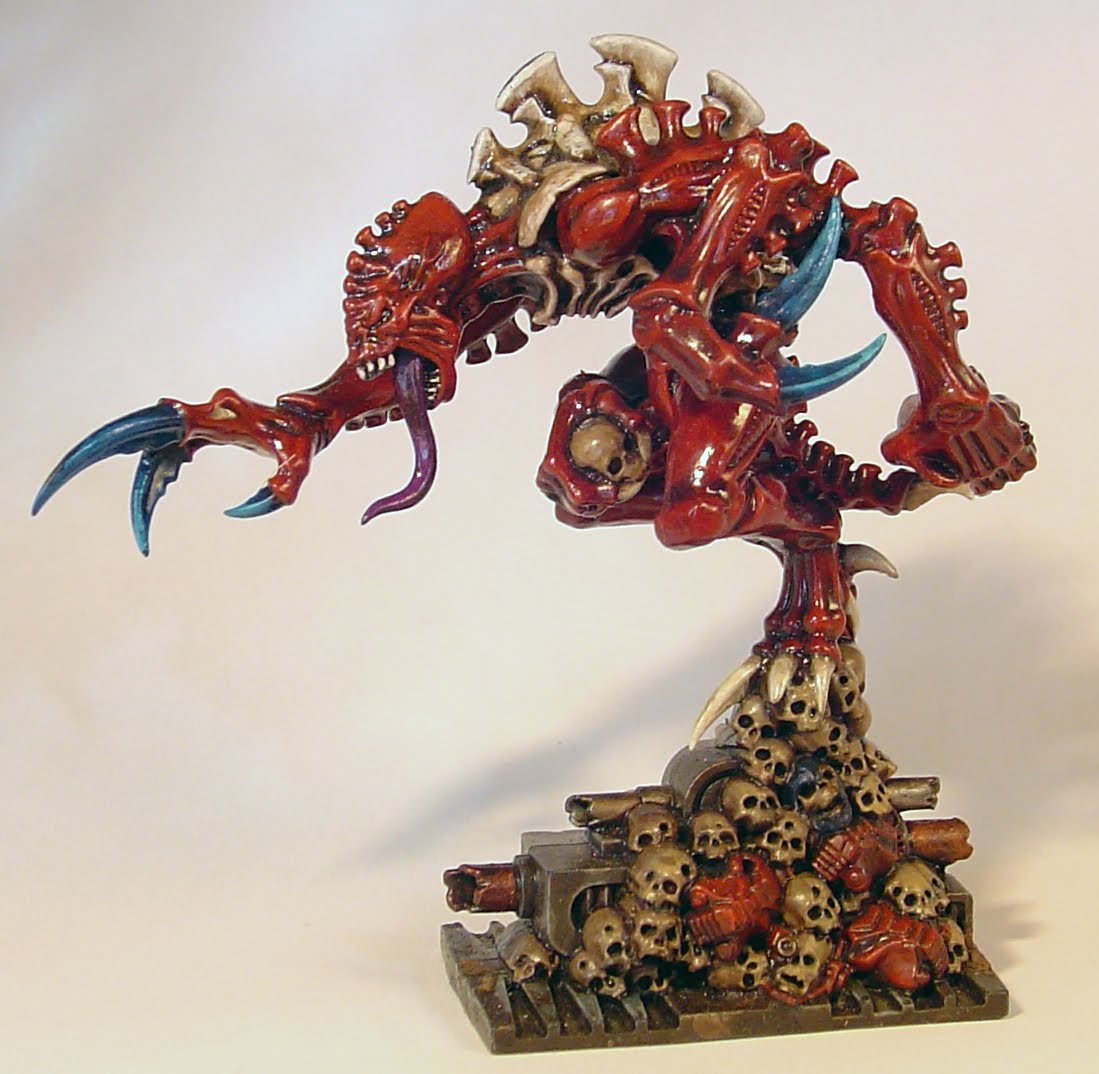
Greetings everyone! After the heavy tactical content of my last post, I decided it was time for some lighter fare. I've been trudging through painting a Space Hulk set and recently finished up the Genestealers.

If you've seen the Broodlord I did, you might know that these guys have a non-standard color scheme. The reason for this? I'm painting them for a friend so that they can also field in his Tyranid army. He loaned me a couple sample figs to compare against. Note that these were NOT painted by Mark or myself. They were done by a friend of his up in Portland. First up was a simple Genestealer:Each major color was a simple basecoat, drybrush or heavy edging, and then maybe a wash. The application was... generous and layering non existant. I knew I could just slap something out at the same level pretty quickly... or I could challenge myself to paint better. I opted for the latter.
I do have to give the guy some credit: the paint job is fine tabletop quality and there are a lot of great conversions conversions and base work, as evidenced by this Warrior:The very first thing I did was nix the big green accent marks and large purple gun. I did keep them as accent tie-ins on eyes and tongues, but desaturated so that they wouldn't mar the overall effect. This brought the main colors back to a split compliment balance of true red, brown-white, and blue. Go read Sandwyrm's excellent series on Color Theory for a more detailed explanation. Then I did the guys a little something like this:There are 22 Genestealers in total. I did a test piece to see if the re-color and concept would work. Then I did the rest in sets of 7.The red is Mechrite Red darkened with Black, midtones of Red Gore, highlights in Red Gore mixed with Bleached Bone, inked in Black and washed with Red. Most of the base=>mid=>high transitions had 2-3 mix steps in between as I was thinning for translucent layering. This was an experiment that more or less worked, but was time consuming.The bone carapace was a base of Khemri Brown, midtone of Graveyard Earth mixed with Bleached Bone, highlights of Bleached Bone and then a couple washes and inks of Sepia and Devlan Mud. When I say "ink", that's usually undiluted ink or wash deliberately placed into recesses. "Wash" was usually a thinner version that was applied to the whole area to blend the color layers and darken the tone.The claws were based Regal Blue, midtone Ultramarine Blue, highlit with Ice Blue and washed with Asurmen Blue. I deliberately used a a non-transitional set of color here to make them look like they were glowing or powered rather than just claw.These guys were all sealed using diluted Future Floor Wax, to give that nice "new floor or wet Genestealer" sheen!

As a break from just painting bugs, I also knocked out two of the objective markers
Ironically, the Genestealers and Screamer-Killer I did ended up being about 1/2 of Mark's army at a recent torunament. Why ironic? Mark won "Best Painted"... and his idea of a complex paintjob is to touch up the drybrushing after dipping the model in wash. Even better is that in all my years of playing, I've never won Best Painted. I've gotten every other top laurel, but it's just never worked out for me to get that one. Heh.

Cheers and see you next time!
*** All images taken by ME! Use them at your peril...***

Sunday, April 25, 2010

Space Hulk Librarian

Hello All!
Continuing show & tell time, here's my recently finished Space Hulk Librarian. I still want to go back with DullCote to tone down the shine on much of him, especially the recesses of the tabard. But I'm currently out of DullCote and the photo setup was ready, so I decided to go ahead and get some pics. Here's what he looks like, in all his flaws and glory:I'm not ecstatic about his face. It seems my limited selection of flesh tone paints had died and dried up over the years since I last used them. As it's tricky to get good artist paint late at night and I wanted to be done with this damned project, I mixed this and the highlighter up from a couple brown, a red and a white.
I am underwhelmed with several things about this sculpt. There's a number of little details that fell victim of the CAD sculpting process. There also the super-sized axe he's holding up like he's selling it on late night TV. But I've realized the part I hate most is the sculpting on his eyes... or, I should say, the utter lack thereof. They are these huge featureless orbs bulging out of the caverns under his mighty jutting forehead. They look like a normal human had his eye sockets staved in with a sledgehammer and some joker stuffed a pair of golf balls into the cavities. It looks better once I freehanded eyelids, but the effort was probably more than it was really worth. I understand now why many people don't bother to define his eyes or do them with a glow effect.
As if all that weren't enough, I got inspired by the work of several other bloggers and decided to try my hand at doing his shoulder heraldry...It's not a well known thing, but the entire reason I taught myself to sculpt is because I hate doing freehand. Attempting this took me a number of tries... It was bad enough that I had to just scrape the surface clean a couple times. (Yes, I know how bad that is to do... the alternative was worse.) It didn't help that the first time I tried doing it all in metallics. Wow, was that a mistake. Guys, please note that layered metallics do not allow for a clean definition of shape nor blending of tone. Trust me on this mistake.
Still, I'm glad I persevered. I certainly learned that I need to have a better idea of how I want it to look before I start. Also, I need to replace my flesh tones and build a decent wet palette. The end result isn't great work, but it's decent and it's mine. Plus, I'm tired of working on him. It's time to work on some other projects now.

***All images are MINE! They are my precious... and totally posted on the internet. This makes them about as protected as your average Taiwanese hooker. Have fun and don't complain to me if you catch a virus, you perverts.***

Wednesday, March 31, 2010

Space Hulk Broodlord

I've spent the last couple days off work sick with an upper respiratory infection. I'm doing better now and still managed to do a few useful things with the down time. Mainly, I finished off the last of the Space Hulk Genestealers and turned my brush on the Broodlord. He looks a little something like this (Updated Pic):Old Pic:I still need to go back and dull coat the base as it's a little shiny. I'm also thinking about touching up the purple on his tongue and maybe lightening up the top of his back spines.The high-gloss finish on this guy made him a trick to photo. A lot of the subtleties aren't showing. Doesn't help that most of the walls in my place are light-absorbing Khemri Brown and I have a crappy camera. Of course, maybe I could have done a bit more to set up the shot...I'm going to try some other shots during the day to see if I can get something a little better.
Also, we have a cameo by my fearless helper!I also did up a little something for my wife:I found this wee beastie in a bargain bin a while back and have been meaning to do it up for her. She's doing her PhD in NeuroScience and has a thing about brains...

Monday, September 21, 2009

Space Hulk, but different!

Space Hulk is almost old news at this point and I hate going over the same stuff someone else already has. Eriochrome's stealing the math-hammer thunder with his excellent articles over here: http://twilight40k.blogspot.com/. There's also a plethora of people showing how they are painting the figs to greater success than I expect to have. I could also rant about the quality miniatures and product, but that's also been done and re-done too.

(Okay, I have to voice a bit of dissent here... The minis are overall quite great, but there were a couple shortcuts taken on details that I don't like. For example, the obvious CAD undercut of the skull on the right knee of the Thunder Hammer guy. Why not just have it oriented correctly? Or the lack of any decent detail or surface on the hips and legs of the Genestealers. Both are minor, but detract enough that I'd only give these models a 9/10.)

But back on topic! I've gotten the opportunity to paint the new Space Hulk figs for my friend Artimese. He's not a good enough painter to match the Genestealers to the rest of his Tyranid force, so he asked me to do them. I can't really call this a commission as that would be pretentious and imply I was getting paid. But he is a good friend and just had a kid, so call it an act of charity? My requirement was that I get to paint the rest of the figs too, as I wanted to try my hand on those Termies.

It wasn't until I got the box home that I realized I'd also be painting the objective markers and doors. It's the latter that I'm here to talk about today, since I haven't seen anyone else talk about them.
To prep the pieces for painting, I first cleaned the flash off with a hobby knife. They were then lightly scrubbed in a little bit of soapy water and rinsed off. Then I basecoated them with a mix of 50% Liquitex Black Gesso, 25% Future Floor Wax, and 25% water.

To me these doorways appear to be made of corrugated steel plates or some futuristic equivalent. Notably, the cardstock doors and floor pieces are mostly Codex Grey with Fortress Grey hightlights. I tried out 4 different test pieces running from a pure metal look (Tin Bitz w Boltgun "wear") all the way to a pure ceramite (no metallic wear). The resounding favorite was the process shown below. You can click on any image to see a larger version.


Step 1: Codex Grey. The first bit of color was to lay down a heavy drybrush of Codex Grey. I wasn't particularly worried about perfect coverage or smooth lines. I knew I'd be putting a good bit of other color down after this step. Plus, these are just terrain pieces. :-p


Step 2: Fortress Grey. This was the most time consuming step. I went and put highlights on all of the pieces using Fortress Grey. Most of the pieces were done using 2-step layering and then edging with pure Fortress Grey. But I wanted some variation in pieces, so some were done with wet blending and others with direction oriented highlighting. (If these terms don't make sense, poke around the intarwebs. Many painters more skilled than I have excellent articles on these techniques.)


Step 3: Boltgun Metal. Many industrial applications use painted steel for decking and walkways. Wear and tear will eventually reveal the steel underneath along the patterns of greatest wear. So Boltgun was applied in a V pattern narrowing as you go into the doorway. Certain edges and wear points were also given some metallic edging or streaking.


Step 4: Dheneb Mud. This step could better be said as "It's too CLEAN for a Space Hulk. Make it dirty!". Every piece was given 2-3 coats of Dheneb Mud, with emphasis to accumulation on flat surfaces on into crevices.


Step 5: Badab Black. This was the final layer of finishing and shading. A single coat of Badab Black was used to darken the crevices, furthest corners and deepest areas of rust and grime. After this, some extra grime was added to the left side of the piece by painting on a mix of Baking Soda and Dheneb Mud. That was an off the cuff experiment that I'm quite happy with.
The final pieces are sealed with a hard gloss coat (Future) and then dulled back to true with a matte lacquer.

If the step by step wasn't enough, here's each step side by side:


And a big shot of the final "in action" with door and flooring:

Now if I don't get distracted by the in-laws coming to visit, I may even work on some of the other Space Hulk minis and/or my overdue sculpting tutorial. Cheers and hope you've enjoyed!