Showing posts with label Painting. Show all posts

Friday, May 14, 2010

W&N Matte Varnish

Greetings! A while back I ran out of my trusty bottle of Dull Cote Lacquer. Needing a replacement, I dropped by several stores to see if I could pick up a new one. Yet while I found the spray can version at a couple places, nobody was carrying the brush-on version.

Why did I care? Because there's certain things you can do with brush application that just don't work with spray. You can hit (or avoid) specific parts, control the thickness of coat, and get a LOT more coverage for your buck. On the downside, it requires a more time to apply and can be fiddly. But I figure that after I've spent *mumble mumble* hours on my average fig, what's an extra 5-10 minutes to hand apply the lacquer?

Eventually my quest washed my up at my local fine art store. Alas, they did not have what I was looking for. However, they did have a 75ml bottle of Winsor & Newton Matte Varnish. At only $5 after my university discount, it wasn't that much more than a spray bottle.

So here's Before:And After:About 5 minutes work and an hour or so of drying. Interestingly, my camera saw a large difference in saturation and muddled some of the colors... especially on the lighter yellow tones.

I've now done several figs with this product and have been very happy. It applies smoothly, tones things done VERY well, dries in a reasonable amount of time and doesn't leave the "grainy" feel that I've seen with sprays. It also thins out quite nicely.

However, do NOT mix it with other varnishes. The glossier a varnish is, the tighter and stronger a coat you get. Thus a gloss is much less likely to chip or flake compared to matte version. I normally do a base seal of gloss and then matte over that to the desired veneer. A couple days ago I started applying a bit of the matte to a fig when I realized I'd forgotten to do the base gloss. So I switched over, not thinking of what might happen... Yeah, it turned milk white. I should have taken a photo as it would have been an excellent example of what not to do.

Other than that, I have been quite happy with this product. I expect you'll see (or not see, as it is clear) this product on my figs for many, many posts to come.

Cheers and see you later!
***I'm sure the starter image is W&N's, but the others are my work...***

Tuesday, May 11, 2010

Space Hulk Genestealers

Greetings everyone! After the heavy tactical content of my last post, I decided it was time for some lighter fare. I've been trudging through painting a Space Hulk set and recently finished up the Genestealers.

If you've seen the Broodlord I did, you might know that these guys have a non-standard color scheme. The reason for this? I'm painting them for a friend so that they can also field in his Tyranid army. He loaned me a couple sample figs to compare against. Note that these were NOT painted by Mark or myself. They were done by a friend of his up in Portland. First up was a simple Genestealer:Each major color was a simple basecoat, drybrush or heavy edging, and then maybe a wash. The application was... generous and layering non existant. I knew I could just slap something out at the same level pretty quickly... or I could challenge myself to paint better. I opted for the latter.
I do have to give the guy some credit: the paint job is fine tabletop quality and there are a lot of great conversions conversions and base work, as evidenced by this Warrior:The very first thing I did was nix the big green accent marks and large purple gun. I did keep them as accent tie-ins on eyes and tongues, but desaturated so that they wouldn't mar the overall effect. This brought the main colors back to a split compliment balance of true red, brown-white, and blue. Go read Sandwyrm's excellent series on Color Theory for a more detailed explanation. Then I did the guys a little something like this:There are 22 Genestealers in total. I did a test piece to see if the re-color and concept would work. Then I did the rest in sets of 7.The red is Mechrite Red darkened with Black, midtones of Red Gore, highlights in Red Gore mixed with Bleached Bone, inked in Black and washed with Red. Most of the base=>mid=>high transitions had 2-3 mix steps in between as I was thinning for translucent layering. This was an experiment that more or less worked, but was time consuming.The bone carapace was a base of Khemri Brown, midtone of Graveyard Earth mixed with Bleached Bone, highlights of Bleached Bone and then a couple washes and inks of Sepia and Devlan Mud. When I say "ink", that's usually undiluted ink or wash deliberately placed into recesses. "Wash" was usually a thinner version that was applied to the whole area to blend the color layers and darken the tone.The claws were based Regal Blue, midtone Ultramarine Blue, highlit with Ice Blue and washed with Asurmen Blue. I deliberately used a a non-transitional set of color here to make them look like they were glowing or powered rather than just claw.These guys were all sealed using diluted Future Floor Wax, to give that nice "new floor or wet Genestealer" sheen!

As a break from just painting bugs, I also knocked out two of the objective markers
Ironically, the Genestealers and Screamer-Killer I did ended up being about 1/2 of Mark's army at a recent torunament. Why ironic? Mark won "Best Painted"... and his idea of a complex paintjob is to touch up the drybrushing after dipping the model in wash. Even better is that in all my years of playing, I've never won Best Painted. I've gotten every other top laurel, but it's just never worked out for me to get that one. Heh.

Cheers and see you next time!
*** All images taken by ME! Use them at your peril...***

Sunday, April 25, 2010

Space Hulk Librarian

Hello All!
Continuing show & tell time, here's my recently finished Space Hulk Librarian. I still want to go back with DullCote to tone down the shine on much of him, especially the recesses of the tabard. But I'm currently out of DullCote and the photo setup was ready, so I decided to go ahead and get some pics. Here's what he looks like, in all his flaws and glory:I'm not ecstatic about his face. It seems my limited selection of flesh tone paints had died and dried up over the years since I last used them. As it's tricky to get good artist paint late at night and I wanted to be done with this damned project, I mixed this and the highlighter up from a couple brown, a red and a white.
I am underwhelmed with several things about this sculpt. There's a number of little details that fell victim of the CAD sculpting process. There also the super-sized axe he's holding up like he's selling it on late night TV. But I've realized the part I hate most is the sculpting on his eyes... or, I should say, the utter lack thereof. They are these huge featureless orbs bulging out of the caverns under his mighty jutting forehead. They look like a normal human had his eye sockets staved in with a sledgehammer and some joker stuffed a pair of golf balls into the cavities. It looks better once I freehanded eyelids, but the effort was probably more than it was really worth. I understand now why many people don't bother to define his eyes or do them with a glow effect.
As if all that weren't enough, I got inspired by the work of several other bloggers and decided to try my hand at doing his shoulder heraldry...It's not a well known thing, but the entire reason I taught myself to sculpt is because I hate doing freehand. Attempting this took me a number of tries... It was bad enough that I had to just scrape the surface clean a couple times. (Yes, I know how bad that is to do... the alternative was worse.) It didn't help that the first time I tried doing it all in metallics. Wow, was that a mistake. Guys, please note that layered metallics do not allow for a clean definition of shape nor blending of tone. Trust me on this mistake.
Still, I'm glad I persevered. I certainly learned that I need to have a better idea of how I want it to look before I start. Also, I need to replace my flesh tones and build a decent wet palette. The end result isn't great work, but it's decent and it's mine. Plus, I'm tired of working on him. It's time to work on some other projects now.

***All images are MINE! They are my precious... and totally posted on the internet. This makes them about as protected as your average Taiwanese hooker. Have fun and don't complain to me if you catch a virus, you perverts.***

Friday, April 23, 2010

Nid Screamer-Killer

Cheers and welcome back to another exciting adventure in rambling 40K blogging! I thought about sparing you all the wall of text and just doing some pics, but the pics can't tell the full story...

So today's post is on an old Tyranid Hunter-Screamer-Killer. A few weeks ago, my friend and gaming buddy Mark called. He wanted to see about picking up the Space Hulk Genestealers I'd painted for him. (They'll be detailed in a future post once I get more pics of them.) This was a Tuesday and he wanted to use them in a tournament that Saturday. (Sadly, I had family obligations and couldn't attend.) While we were chatting, it came up that he was still debating his list. He knew what he wanted to run but it would knock a few painting points because his Carnifex was only primered. I gave it a quick thought, calculated the timing and told him that if he got it to me soon, I could have it at least minimally painted. So he dropped it off the next evening.

Then per the best laid plans of mice and men, I got sick with a nasty upper respiratory infection. I spent a couple days doing nothing more complex than sleeping and coughing. I wasn't able to focus on the fig until some time Friday evening. I should note that I'm not a fast painter; glacial might be a better label. I over think things, apply more layers than most people will ever notice, get easily distracted and generally move projects along only when the muse is with me. But I was down to the wire for this guy. I threw on the main basecoat of color in about an hour. This ended up being a good thing as I got a call from Mark as I was just finishing a wash of Devlan Mud. Seems he wanted to get a full night sleep and could he pick them all up in an hour? Silly Mark, sleep is for the weak! So I spent the last hour doing highlights (while avoiding the still-drying wash), picking out details, and fixing any glaring mistakes. The end result was this:And from the back:I have to say, I'm pretty damned happy with the results for only 3 hours at the painting table. Also, yes, these were taken with the new lightbox setup.

***All images are MINE! What am I going to do if you borrow them? Throw a hissy because you like my work?***

Wednesday, March 31, 2010

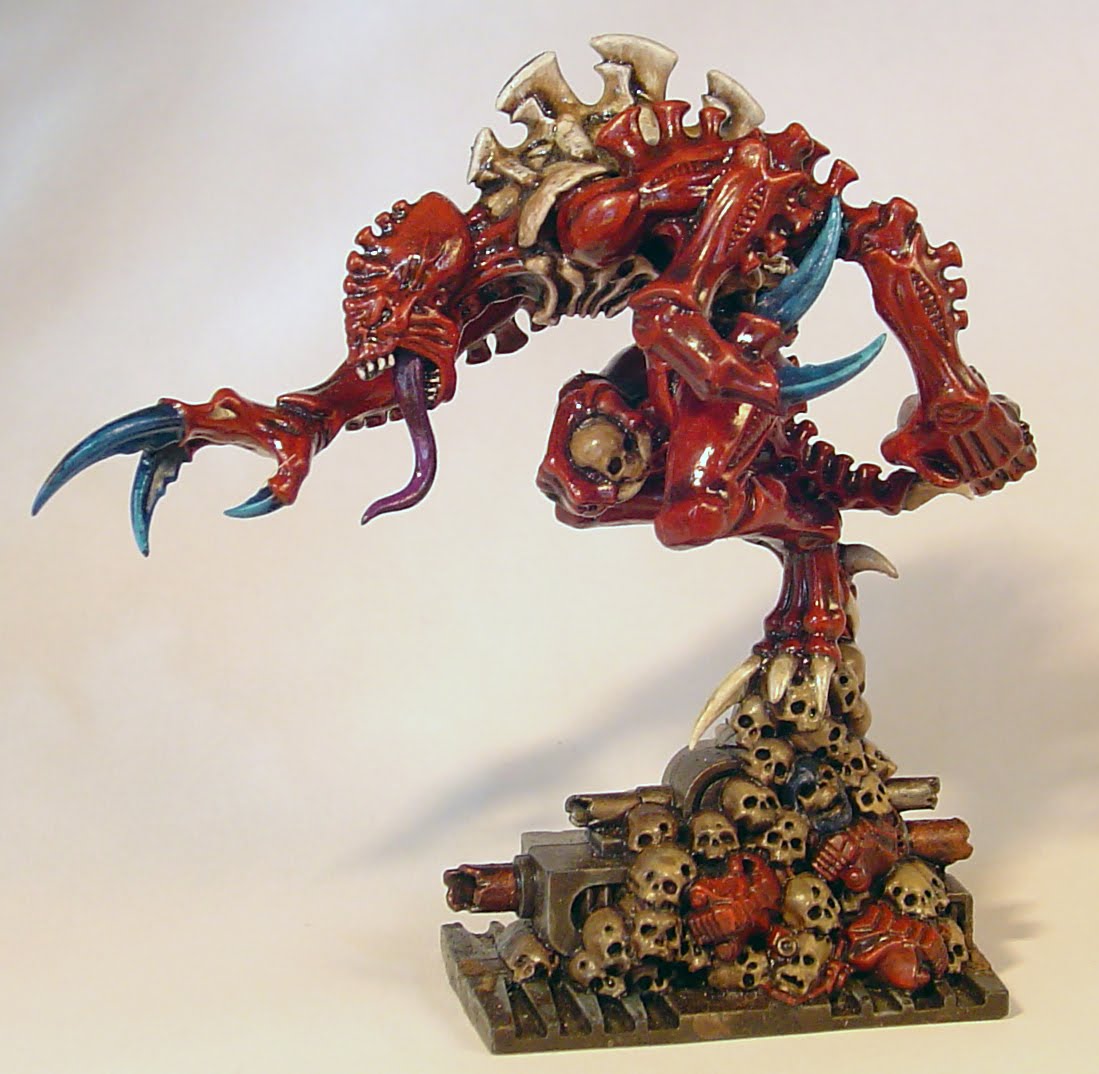
Space Hulk Broodlord

I've spent the last couple days off work sick with an upper respiratory infection. I'm doing better now and still managed to do a few useful things with the down time. Mainly, I finished off the last of the Space Hulk Genestealers and turned my brush on the Broodlord. He looks a little something like this (Updated Pic):Old Pic:I still need to go back and dull coat the base as it's a little shiny. I'm also thinking about touching up the purple on his tongue and maybe lightening up the top of his back spines.The high-gloss finish on this guy made him a trick to photo. A lot of the subtleties aren't showing. Doesn't help that most of the walls in my place are light-absorbing Khemri Brown and I have a crappy camera. Of course, maybe I could have done a bit more to set up the shot...I'm going to try some other shots during the day to see if I can get something a little better.
Also, we have a cameo by my fearless helper!I also did up a little something for my wife:I found this wee beastie in a bargain bin a while back and have been meaning to do it up for her. She's doing her PhD in NeuroScience and has a thing about brains...

Sunday, March 28, 2010

Brush Cleaner

I'm a cynic in general and especially when it comes to rave product testimonials. I always wonder if the person's a paid shill or getting a kickback. Still, late last year I was cruising the interwebs and came across a post on caring for your brushes.

Now after ruining my first few brush sets, I picked up the normal care stuff like cleaning and rinsing as I go, cleaning with a bit of soap at the end of the day, storing them so that the tips don't get smooshed... all that. But I'll admit, over the years I've mainly bought GW brushes. Their drybrushes are pretty nice and the normal ones aren't that bad. Even better, they're readily available and not too expensive. So if one died, it wasn't any big deal. While "art store" brushes might be nicer or hold a point longer, the costs never balanced out. They would be three times the price to only get twice the longevity. So I only bothered with a nicer brand for my detailing brush.

Then Thanksgiving '09 rolls around and the family is headed out of town to spend the weekend with the in-laws. Now an evil thing about Tucson is that my favorite art supply shop is right next door to my favorite coffee shop. It's a dangerous combination for my checkbook... If you're ever in town, swing by the area. It's worth the time. They get bean from Intelligentsia and have a pre-Starbucks Clover! There's also a large used bookstore about a block away. It's not Powell's, but decent and local. Also cruise across town to stop at Hat's Games and drop me an e-mail if you want to arrange a game!

Ack, back on topic! Faced with the choice of several days socializing with my in-laws or sitting on the porch painting minis, I needed a new detailing brush! We stop to get coffee for the drive and I pop into the art store. A master of swiftly grasping the obvious, the big neon orange "30% off" sign on Escoda brushes eventually catches my eye. I decide to splurge and pick up a few brushes, including a size 6 shader. (I've been VERY happy with it.) Ironically, due to an error on my part, the detailers I picked up were actually watercolor brushes. Thankfully, my wife and some friends do watercolor Illumination and can use them.

Anyways! While I was standing there in line contemplating how to tell my wife that I just spent the cost of a sushi dinner on three tiny brushes, my eye falls upon this:Yes, a jar of "The Master's" Brush Cleaner and the eventual topic of this post! I figured I was already spending too much and remembered that article I'd recently read... so I tossed in a jar to try it out.

This stuff is AWESOME.

So awesome, I was tempted to make "AWESOME" animated with sparklies...

One of the color shifts I've always hated switching between is from painting red to painting white/bone. Yes, the same colors as my Eldar army. Why do I hate this so? Because despite how transparent GW red is, the damned pigment is PERVASIVE. You can clean your brush obsessively and it will STILL creep back in and tint your clean white lines an annoying pink! I already get enough guff for being an Eldar player, I certainly don't need them PINK!

So how awesome is this cleaner? Let me tell you... no, no, let me SHOW you! I did a bunch of Mechrite Red on a Broodlord for a friend and then cleaned my brush. The brush was dipped into clean water, spun at an angle against the side of the water cup to open up the bristles, and then the head and ferrule were press wiped on a napkin. Here's what the napkin looked like after cleaning with water:I did 2 sets of wipes with 6 on each row for a total of 12 wipes. The end result looks pretty clean, right? Well, then I immediately took the "clean" brush and did the same process with brush cleaner. Here's the result:All the pink you see is what came out AFTER I'd already "cleaned" the brush with water. How about an overall shot:With the brush actually clean now, I was able to immediately switch to working with white and didn't have any pink discoloration. Even better, this stuff can help restore old brushes and helps your current brush keep it's shape longer.

So pick some up and try it out. You won't be disappointed. Just don't forget to rinse your brush before sticking it in your mouth... this stuff tastes almost as horrible as GW's Foundation paints. (You should never stick your brushes in your mouth... don't ask me why I know how these things taste. :-p )

Cheers and hope you've enjoyed my mad ramblings this afternoon! I needed something to do and knew better than to try and paint fine detail when doped up on cough medicine. Maybe I should apply that rule to blogging too...

UPDATE: It looks like I'm not the only one shilling for General Pencil this weekend... The esteemed Colonel Corbane also posted on how awesome this stuff is. Great minds think alike or simple minds seldom differ? :-p

And no, I didn't receive a dime for any of the links in this post.

***Images grabbed from this site, General Pencil and my camera.***

Saturday, January 9, 2010

My Farseer on a Jetbike

So a recent inquiry got me thinking about my blog content and things I've been meaning to do, but for whatever reasons not yet done. One of those things "to-do" is moving over some posts I pseudo-blogged on my Flickr a few years back. So to start, here's the big one: my Eldar Farseer on a Jetbike "Reboot". I've shown the final product in my Sculpting 101 (and to the right), but some of you might enjoy seeing the process of how I got there too. I could probably stretch this out to several posts, but that seems like cheating...

This fig started back in 3rd edition when I decided I needed a JetSeer. I had a few extra jetbikes but my only "spare" Psyker was an Eldrad model. I also knew I didn't wanted the lounging pose typical of the current jetbike riders. I wanted something more active, upright, dynamic... and thus an Idea was born. I sat down and chopped Eldrad into pieces for his head and torso. As a side effect of repositioning his head, I had to reculpt the left side of his face. Then I replaced his arms and legs with Guardian bitz and some repositioning. There was a fair bit of drilling and pinning to make sure the armature could support the metal upper pieces too. Then I sculpted some details such as a loin cloth, fills, runes, a couple spirit stones and other such. I ended up with something that looked a little like this:
Notably, this was my first (and last) experiment sculpting with White Stuff. It's been relegated to gap filler. I was still fairly happy with the final product, excepting the hilt and how he was gripping it. I considered it good, gave him a basic paintjob and used him for several years.

Then along came this new idea of blogging about your 40k hobby. There was this up and coming new site I'd been reading called "Way of Saim-Hann". Fritz decided to promote by having a little contest. The only rule was that it had to be a Jetbike Mounted Eldar HQ. I figured I'd just take my Farseer, do some more paint detailing and then throw it into the mix. But as I was considering this, I came across the blog of some guy named Ron at From the Warp who was also doing up a fig to enter. He didn't even play Eldar! He was doing the fig for the competition and a friend's new army. (And oh did it show in his initial choice of wargear... a bike Autarch with a powerweapon? Sheesh. :-P Thankfully, he welcomed suggestions.) But the kicker was that he had some pretty solid concept sketches... We went back and forth raising the bar, commenting and critiquing along with a group of like-minded bloggers. Ron ended up taking first with his solid conversion and excellent paintjob on this Autarch. But I've realized I don't care about having won or not... The prize was more Eldar, something I didn't need but Ron's newbie friend did. But even more so? The blog community banter continually pushed things to that next level. There result was a number of truly excellent entries. My final product was of a much higher scope and quality than I would have attempted on my own. I ended up with the only model I've been happy enough to actually pit into CoolMiniOrNot. The glory of such a great competition, my final fig, and the skills I acquired along the way were worth more than any mere prize. (Yeah, I would have been happy to win, but it wasn't... necessary. Hopefully you understand.)

Enough background, back to the fig: I knew I wanted to redo several things about this guy. I had seen this stellar work by Scibor and thought "I could do something like that..." As I'm not one for direct copying, his was an inspiration but I wanted the final to be something all mine. So the first thing to do was sketch. I ran up a dozen little sketches before I had my basic concept. I kinda wish I still had those... it would be amusing to show you how many things did or didn't make the final. So then I broke apart the original fig, cleaned off the nasty White Stuff, got a fresh jetbike canopy and worked up the start for a decorative (and magnetic!) base. After the initial layer of putty we had this:
The above is after my first session of basic sculptwork. In addition to the other changes, I decided he needed a Singing Spear. So I grabbed the sword from that blind High Elf (Eltharion) and stuck it on a bit of wire as a place to start. (I'm sure there's a tasteless joke there, but I'll refrain... this time.) This was also the point of my first revelation with sculpting: "You don't have to do every detail on a piece in one go." It's simple in retrospect that you can add other details later and smooth them in, but prior to this I was trying to do all GS work on an area in one step. Oh, the hours of frustration I could have saved...
Next, I decided to bring the canopy back even farther than the initial plan. To support this, I inserted some lengths of sewing pins to make a basic armature.
Along the way I like to dry fit things together to check the pose and get a little "is this worth it" check in. I'd also finished the sculpt of the face and started canopy details.
Yet more canopy trim. The spear got a butt-cap from the 2007 Farseer's staff and some basic shaping on the shaft.
Here I decided I hated the GS on the shaft and redid it along with some pieces from a DA Exarch power weapon. I also added the spaulders (upper arm armour) that I'd been thinking about from the initial sculpt. This main lines of the spaulder were made with the same technique as the edge of the canopy. The pattern in the recesses was done by placing a thin layer of GS inside the edging and then stippling with the point of a pin.
Added the first rune! It's a combination of the runes for Farseer and Jetbike. Yeah, I'm just that nerdy. (Okay, I'll admit that I had no idea where I was going at this point... I'd been considering doing runes like this across the whole canopy area, but my test pieces just didn't look "right".)
Finished up the Singing Spear using some wrapped copper wire from an old circuit board. I also started the GS on his cloak and doodled my initial idea for the top of the canopy using a fine tip marker. Note the repeat of the Farseer/Jetbike rune. I tried this out when I got to the sculpt phase but I didn't like the the off-set look of the lightning bolt after trying it. So I scrapped that idea for something different...
And here's how the jetbike canopy decided it wanted to come out... I also added a bit from the plastic Wraithlord to the end of the wing.
Same session, different angle. I think I was fishing for commentary on the wing bit. At some point I realized it killed the lines and just removed it.
Ah, the example of what the trim/edging looked like when first applied but before sculpt. I had a couple inquries into how I did it. So I took this pic as an example of the intial putty application. The sculpting was basically pulling out and down from the center of the line to trim down to the amount of putty and basic shape wanted. Then the point of the sculpting tool was pushed in along the bottom to sharpen the line/canopy edge. Then I would lightly run the flat buffing side of the sculpting tool along the tip of the line to flatten. Repeat in sections until finished. (If anyone is interested in the technique but can't make sense of the above, just ask and I can try explaining with graphics.)
A rather blurry pic of the Spear, having been permanently attached to the arm and given a basic hand sculpt. I was actually kinda put out by my sculpt on the hand... the old plastic right hand looked clunky and mis-shapen compared to how nicely this one ended up.
Here I added the detailing to the back of his hand. I also took my wife's advice and enlarged the gemstones on the canopy... she was right too.
And a shot of the center...
Added detailing and a gem to the triangle at the top of the canopy. I also dropped in a spirit stone and some ribbons at the wrist.
This run I'd originally added a kind of growing sine wave pattern to the front part of the canopy left... I was thinking a flame or flamberge or something. But I was only "doodling" in GS and not set on any one thing. I gave up for the night and came back to it the next day, only to see an Astral Serpent staring back at me. A little more putty and he was realized in the flesh, so to speak. Though this became a comedy of frustration... It took me several tries to get the head to satisfaction. Once there, I took this photograph. Then, thinking to work on some other canopy details, I picked it up... and managed to squish the head. So I redid it several times, only to mar it again by fumbling the canopy as I was setting it down to cure. I ended up resculpting that damn head probably 2 dozen times total before I was happy with it again. This was my second big revelation of sculpt: "If you're happy with a detail, set the piece aside and let it cure." Otherwise, you're liable to screw it up and have to redo it.
More on the canopy and sand added to the base.
The canopy was still getting sculpt, but I gesso primed everything else to black. Again my wife came to the rescue and pointed out that an Egyptian stylized eye would really finish out the canopy nicely... curse her for being right again! The sand got a base coat of Scorched Brown and then a drybrush up with Beastial Brown, Snakebite Leather and Bleached Bone.
Codex grey edging/highlights on the base and finished the sculpt on the eye.
And here we skip ahead a couple days... The canopy has been finished and primed. The tan "wraithbone armour" areas have been based Scorched Brown and the red with Red Gore.
Here some color appears on the canopy. Several bone pieces have been lightened up using Vallejo USA Tan Earth. Several gemstones were also done in the "GW style" using Midnight Blue, Ultramarine Blue, and Ice Blue for the main and a single dot of Skull White for the "gleam".
Here the wraithbone of the canopy was blended up using Vallejo USA Tan Earth in way more coats than the final effect seems to show. I also did up the canopy gems and basecoated his cloak in Red Gore.
This was the same session as above, but I was playing with the camera angle to see what I wanted for the final composition.
Light bone from a black base is a pain in the ass. I've since switched this to a white basecoat and have found that MUCH easier. So here the canopy is done and the body of the bike taken to Scorched Brown.
More bone... I spent about 4 aggravating hours between this step and the last. I'd hit the "ugly phase"... where things aren't coming together quite as you planned, everything takes too long and you generally just want to drop the project into a dark place and never look at it again. I was frustrated with how his upper shoulder pads were sticking into the air and annoyed with how much time the bone was taking compared to the results I was getting. Still, I pushed on...
and started having things come together. I blended up the main body pieces to Blood Red and did the "reverse glow" on the spear tip using the same blues as on the gems. The effects really made something "click" in my brain. I found myself much happier with the fig... to the point that I got so into painting that I forgot to stop and take progress pics.
Here I went back and touched up my little errors. As I did this, I managed to somehow get wet gesso on my thumb and obliterate the big gem on the canopy. So I got to repaint that too...
The "final". I took a couple dozen photos of the final presentation from different angles and lighting styles... I had to compensate for a crappy camera and all. The best one went into Photoshop and had the colors trued as best I could. Then I erased the white background and dropped in a dropping gradient. I chose blue to compliment the gems and give a ground/sky effect.

Whew... did you actually read all of this? Cheers for getting through that wall of pics and text! (I think I tripled my current pic load with this one post.) Hopefully this write-up was interesting or even a little inspiring. If you have any questions about tools, technique, or otherwise, please feel free to ask.

Irony. Looking back at the details of this project, I'm realizing that rehosting the post isn't the only stuff I've put off regarding this fig. There's several bits of highlight, freehand and other details that I wanted to do on this guy. But I haven't put a lick of paint on him since the competition. I get the feeling I'll be showing this guy again but with some new details.

***Images are all mine, baby!***